In this section, you'll be able to find answers to common questions as well as more advanced troubleshooting.
To navigate FAQ & Troubleshooting, click on the topic on the left menu to open its contents.
Welcome
Glad to have you on board!
Jet Admin is an app builder that allows you to create Client Portals, Business Apps, and Internal Tools with your existing data, whether it's from databases, APIs, or Storages. You can build apps such as Onboarding apps, Admin Panels, Vendor portals, CRMs, and much more quickly and without code.
This 2-min video will explain what Jet Admin is and what you can build with it:
Academy
In Jet Academy, you'll be able to learn both the fundamentals of Jet Admin and more advanced topics through a series of short tutorial videos.
To navigate Academy, click on the topic in the menu on the left to open its contents, or get started with the most basic functions:
Getting Started
In this Crash Course, we'll learn the fundamentals of Jet Admin so you can start building your app today.
We'll also dive deeper into advanced concepts to help you get the maximum juice for the squeeze.
Finally, we'll build some of the most popular kinds of apps together, guiding you step by step from the square one to production-ready.
Connecting Data Sources
In this section, you'll learn how to connect your Data to Jet Admin.
You can connect as many data sources as you need to create a centralized place for all your operations. You can integrate with anything using native integrations or custom APIs.
Use the submenu to navigate to a particular topic or start with the first one:
Jet Database
Google Sheet
Custom API Action (Zapier)
Firebase
Data Editor
Data Editor is a key part of the Jet Admin App Builder. Typically you end up in Data Editor right after you connect your data source(s).
In Data Editor you can audit, edit, and refine your data before using it in the App Builder.
Data Editor Interface
This short video will help you understand how to get around Data Editor and start working with your data more quickly.
Data Source Settings
Once you've connected your Data Source to Jet, you can specify its settings, specify the sync intervals, see audit logs, manage collections (tables), and more:
Prepare & Organize Data
Before you start working with your data, it makes sense to organize it so you can easily access the relevant parts.
This video covers the basics of sorting, filtering, working with columns, and more.
Edit Data
In this video, we'll learn how to edit your data in Data Editor:
Edit particular fields
Add and delete records
Field Types
This video explains how to change field types so that you can make sure your data is rendered in the correct format.
Related Data
In this video, we'll learn about the related data – what this means and why relational databases are such a great concept. We'll also learn how to work with related data in Jet, how to set relations, and what to do with these related data sets later on.
Lookups & Rollups
In this video, we'll learn about the very powerful field types Rollups and Lookups. We'll also go over an example of how to use them to "look into" the related table and get the information you need from there.
Files & Storages
This is the overview video on how to work with files in Jet, whether that means connecting an Airtable with files attached to records, connecting a dedicated storage such as Firebase, or using another data source.
Data Blending Intro
In this video, we'll look behind the "no-code" curtain and explore how you can consolidate data from multiple data sources (Non-SQL included) using custom SQL queries.
App Builder
In this Crash Course section, we'll learn the fundamentals of the App builder.
App builder is a core part of Jet Admin. It allows you to assemble your UI, and layout as well as bind and transform data to create custom user flows for your app. All this is done through an intuitive Drag & Drop and Point & Click interface.
Go into the submenu to navigate to a particular topic or start with the first one:
Builder and User Modes
Any app you'll create with Jet will be built in the Builder mode so it's important to understand what it is and how it interacts with the user mode where your end users will be using the app
Pages and Overlays
Before diving into the features of the builder, it's important to understand the fundamental structural elements of any app you build with Jet: Pages and Overlays.
UI Builder
UI builder is a part of the App builder and allows you to assemble the UI components on the page using pre-made Drag & Drop UI components
Bind Data to UI
To build any app you'll need two things: your UI and the data. But how to link or connect the two in Jet Admin? Learn in this video
Bind Filter to Table
In this and the following videos, we'll cover how to bind data and components in various situations. In this video, in particular, we'll learn about the Filter-Table binding use-case: you have a filter component and you want all the inputs in it to be passed over into the Table and used to filter it.
Bind Input Field to Table
In this video, we'll learn about the Field-Table binding use-case: you have an input field component and you want a value from a specific column from in a selected row of a Table to be fetched into this field
Bind Form to Table
In this video, we'll learn about the Form-Table binding use-case:
You have a Form and you want this form to dynamically receive the values from a selected row (a record) of a Table into the fields of this form
Bind across Pages
In this video, we'll cover binding UI elements from separate pages:
You have a Table on Page 1 and an input field on Page 2 and you want, when you click on the specific row in the table to drill down into Page 2. Additionally, as you drill down, you want to "pass" a specific value from a selected record in the Table into the input field on Page 2
Bind from Page to Modal
In this video, we'll cover binding a UI element in the Modal to the UI component on the Page:
You have a Table on a Page and an input in a Modal and you want, when you click on the specific row in the table to open up the Modal. Additionally, as the Modal opens up, you want to "pass" a specific value from a selected record in the Table into the input field in the Modal
Calculcation & Formulas
Team & Users Permissions
Automations
Environments
Custom API Collection
Create Multi-Step Forms
Component Designer
Build Apps Together
In this section, we'll go over specific apps, building each use-case from scratch to the point when it's up and running.
Go to a specific one in the submenu or start from the first one:
Custom CRM
Internal Tool
Supabase CRM
Import Figma design to Jet
Supabase Auth
Firebase Auth
Xano Auth
How to clone the whole app?
If you want to duplicate your app, you can save your progress as a backup to a file, create a new app, and restore your app from a backup. Please be aware that created actions won’t be copied, you will need to add them manually.
Go to MyApp in upper right corner -> Environment -> Settings -> Download backup
After that, create a new app and go to the Environment -> Settings to restore your backup.
Why new SQL tables are not showing?
If you've added new SQL tables to your database, you will need to manually select new tables to load into JetAdmin.
Go to Data -> Your Resource Name -> Three dots -> Edit resource
Scroll down and click on "Choose Tables"
You will see a list of your tables there. You’ll need to click on checkboxes of tables that you want to add and then click on "Update resource".
Please note that Actions from your original app won’t be copied
Authentication
Generate Invoice or Document
Connect your data: Connect Databases, business apps (Airtable, Stripe, Zendesk), Data Warehouses, Internal and external REST or GraphQL APIs, and File Storage.
Sync and Blend your data: Create a single source of truth (SSOT) that syncs to your multiple data sources (Stripe, Hubspot, Salesforce, ...).
Build App Interfaces: Drag and drop UI components (Tables, Forms, Charts, Details Images) onto Layouts (Modals, Columns, Tavs) and connect them to your data sources.
Customize your app: Design pixel-perfect components or use 50+ ready-to-use components from Marketplace.
Automate your workflow: Create multi-sequence Automation with over 30+ automation blocks and trigger them by Webhook or Schedule jobs every minute, hour, day, or month.
This video might be partially outdated due to product changes - we'll replace it with the fresh one soon. However, you still can use the concepts from it and apply them to the current version
This video might be partially outdated due to product changes - we'll replace it with the fresh one soon. However, you still can use the concepts from it and apply them to the current version
This video might be partially outdated due to product changes - we'll replace it with the fresh one soon. However, you still can use the concepts from it and apply them to the current version
This video might be partially outdated due to product changes - we'll replace it with the fresh one soon. However, you still can use the concepts from it and apply them to the current version
This video might be partially outdated due to product changes - we'll replace it with the fresh one soon. However, you still can use the concepts from it and apply them to the current version
This video might be partially outdated due to product changes - we'll replace it with the fresh one soon. However, you still can use the concepts from it and apply them to the current version
Data is not loading
If your data is not loading, there might be many potential causes for this. This might as well render differently in the UI component: the infinite load, or the error.
In this article, we'll review the most common causes of this issue and help you identify and fix the problem.
Case 1 - VPN
A user supposedly hasn't changed anything but started to get this error:
Solution: Disabling VPN solved the problem - this is the most common reason for such an error. After disabling it, reload the page.
Case 2 - SQL query filters
In this case, a user wanted to display a filtered collection from a custom SQL query but got the "Nothing found" message
Even though the query was correct, it didn't account for the fact that Jet handles filtering automatically, so you should not add the WHERE clause.
Solution: omit WHERE and only set up the inputs and reference them in the query.
Quickstart
👉Before we jump into the thick of it, there is one thing that needs to be clarified:
Internal Tools vs Customer Portals
Both Client Portals and the Internal Tools are the same in their essence - they are just web or mobile apps built on Jet Admin. However, they differ from the usage perspective: end-users of the Portal are external users, e.g. Vendors, Partners, Merchants, or Individuals, whereas end-users of the Internal App are internal users, i.e. your organization's employees. They also differ in pricing.
Typical use-cases for the Client Portal and for the Internal Tool also differ, that's why we've created two separate quickstart journeys based on the common use-cases:
If you want to save time building your app, you can apply one of the templates that you can find on the dashboard. You can preview the templates .
Troubleshooting Django integration
If you are having trouble connecting Django to JetAdmin, you will need to check a few things:
Make sure there are no network restrictions.
Check whether your Jet Bridge is the latest version.
Check your CORS policies in Django.
If your network with Django is okay, and you are using the latest Jet Bridge version but still getting errors like this:
That means that you need to check your CORS policies in Django.
By default, there is a parameter in Jet Bridge for Django that contains CORS in settings.py called "JET_CORS_HEADERS".
It is enabled by default and filled automatically, but if your Django already has an app called “corsheaders” then it turns off. You can configure your CORS settings in the "corsheaders" app instead.
Alternatively, you can try to force "JET_CORS_HEADERS" to be set to True, but it can lead to strange effects, so we would advise trying it only as a last resort.
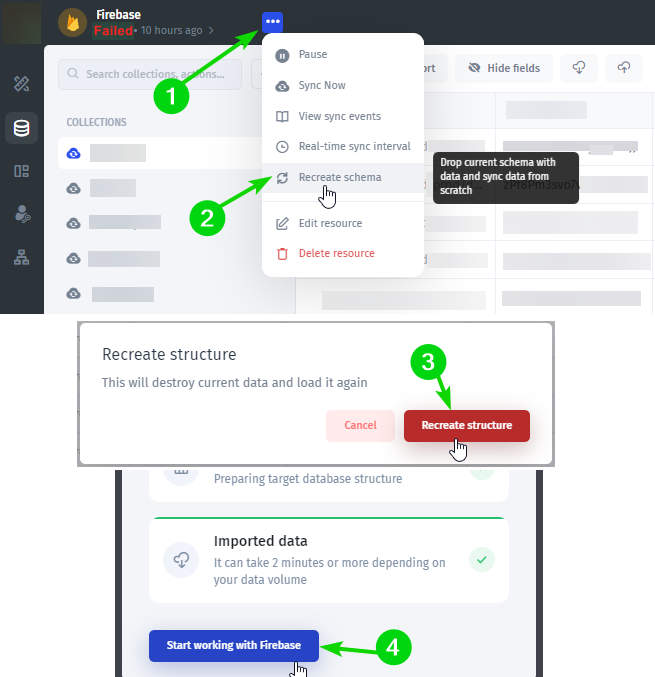
A data resource is failing to sync
After editing in the structure of the database in the third-party integration source, such as Airtable, Firebase, Xano, Supabase, postgreSQL … etc, the sync with Jetadmin might fail sometimes.
To fix this you need to Recreate Scheme.
1- In Jetadmin, open the resource that is failing to sync;
2- Click on the 3 dots button on top-left near the resource name;
3- Choose ‘recreate scheme’ from the menu;
4- Click the ‘recreate structure’ red button;
5- Wait a few seconds till the data is being imported, then click the ‘Start working with …’ blue button.
Now your resource should be synced and working fine.
Building an Internal Tool
Get your first internal app up and running in under 10 minutes
Custom CRM in 10 mins 🚀
To familiarize yourself with how Jet works, let's build a simple CRM that will allow us to View and Edit the Customers:
We'll go through the whole process of creation step by step. Let's start with our data:
Nested filters allow you to go through the layers of relations between collections and filter by ANY field from ANY collection (table), that's related to the original one.
App Customization
Branding, color, typographic and menu
This tutorial will show how to customize the app's primary colors, typography, and menus.
The menu is a great component when you would like to implement navigation between pages.
After you've made the changes to your app, you can preview it to test and, if everything's right, publish it. To preview your app, click on the Preview button at the top.
Great! Now that we're done with the Basics, we can get to the advanced functionality of Jet Admin:
If you want to allow an input to only receive a certain number or text format, you can use regular expressions.
For example, let's say that you want your input to receive an ID number that is structured like this: “010.124.501-55”. If you don’t know how to write regular expressions, you can simply ask any AI bot to do this for you, ChatGPT for example:
After you get your regular expression, you can input it in the validation field of your component. Click on the component in builder -> Display tab -> Validate -> Use Regular expression
You can also mention your field format in the custom validation error field for easier understanding.
Customer portal
This video might be partially outdated due to product changes - we'll replace it with the fresh one soon. However, you still can use the concepts from it and apply them to the current version
Document
Create documents from your data right in Jet Admin
Generate documents for your Jet Admin applications with the Documint.
Bind Related Tables
Slowly ramping up the complexity of the use-cases, now we'll look at the Table-Table binding:
You have two related tables and want, in the second Table, to dynamically show the records related to the selected (clicked) record in the first Table
Built-in Approval Flow
Creating a Customer Portal
In this section you will learn how to create a customer portal
PM Portal in 5 mins 🚀
As an example, we'll build a Portal for a Consultancy agency's corporate clients where they can View their Projects, Edit the related Tasks, and Update their Profile:
To build the portal, we start with preparing the data:
In this article, we'll review the integration with Airtable, and its characteristics and will go through the steps necessary to connect it to Jet Admin
You can connect to Airtable from the data tab on the left menu bar or from the data section within a UI component. You'll need to enter a valid personal access token, and choose a base.
To obtain your personal access token on , follow the steps below:
Go to Airtable's page
Connect your Data
Jet allows you to connect and sync with 50+ data sources: business apps (Airtable, Stripe, Zendesk), Data Warehouses, Internal and external REST or GraphQL APIs, and File Storage. Once a is set up, you can utilize your data to create apps.
This guide focuses on using as the data source. Jet Table offers a quick and secure method for storing and modifying data specifically for Jet applications. It integrates the robustness of a PostgreSQL database with the user-friendly aspect of a spreadsheet interface, enabling efficient data management.
To insert test data into the Jet Database, first download the following provided CSV files:
How to Connect to Slack Channel
Learn how to join our Slack workspace and access your dedicated channel.
Our Slack channels are available for Pro and Enterprise plan users, including:
Internal Tool Pro
Internal Tool Enterprise
Customer Portal Pro
Generate the App
In this section you will learn how to generate the app for creating a customer portal
After creating a project, you'll be prompted to start with the Blank app or your Data. Select your chosen Data Source, fill in the credentials, and finish the process.
Click on the Data Source icon
Click on the Add Resource icon
Link Related Tables
In this section you will learn how to link related tables for creating a customer portal
You can link different tables as long as there's a common field in both of them. In our case, we'll link by the Unit name field.
Drag the Table component and change the mock data to your own. Select the data source you've connected and the page you want to display:
Drag and Drop the Table Component to the page
Prepare your Data
In this section you will learn how to prepare your data for creating a customer portal
You can build Portals with data from pretty much Any Data Source: Firebase, Sheets, Airtable, Stripe, REST API, and so on. We'll use Airtable in our example.
In our case, we will use two tables: Projects and Tasks. The projects table has the Link to Tasks column and the Tasks have the Project column in it.
Apply Frame to Image
Explore how to set up Frame for Image
To set up Frame for Image – add Border to the Rectangle:
Select Ellipse
Designing your component
Discover how to custmize Cards in Gallery
To customize Cards in the Gallery, follow the steps:
Click on the Gallery
Click on the Property card button in the right panel
Deep dives
In depth tutorials covering multiple topics
This part focuses on advanced Jet features such as custom HTTP, SQL queries, conditional visibility, and related fields (e.g. single relation). Let's start with the latter:
UI in seconds
Learn how to generate CRUD interface in seconds
Jet can automatically generate a user interface when creating a new page. There are several use cases that you can cover:
Record Review: allows you to view the details of a record selected from a list.
Record Update: update the data of a record chosen from the list.
Support multi-screens
Explore how to do your components responsive
Responsiveness and support of multi-screens refers to the ability of a design to adapt and display optimally across various devices and screen sizes. It ensures a seamless user experience by adjusting layout and content to accommodate different resolutions, promoting accessibility and usability.
To fit your component to different screen sizes, follow the steps:
Click to fix the width for the text component.
Go to the resizing section in the
Figma design into a web app
From MVPs to web apps, Jet helps you to deliver pixel-perfect apps that users will love.
For the template to become a functional app, It's crucial to correctly bind your own data and set relations between to UI components composing a template. Learn more about it in the Values section.
Joining our workspace gives you direct access to our team. You can ask any questions related to your app in your dedicated channel.
Click the blue question mark button in the bottom-right corner.
Select Slack Channel from the support options.
Follow the instructions to join the workspace.
Your Slack email may differ from your registered email; you can enter a different email if needed.
The default channel name is jetadmin_, but you can change it.
Once completed, you’ll be added to your specific Slack channel.
If you have any issues joining, reach out via live chat or email us at support@jetadmin.io.
How to Join Slack
Step 1: Join the Workspace
Step 2: Access Your Channel
Need Help?
Click on 'Create token'
Create a new token
Copy and save the token in a safe place.
On Jetadmin's builder side, click 'Add Resource' from the data section on the left-side menu
Choose Airtable
Click on 'Sign In to Airtable' button
Click on 'Add a base'
Choose the needed base or workspace
Click 'Grant access'
Choose the base needed
Click the 'Choose tables' button
Select/unselect the needed tables and choose a view for each table
Click the 'Add Resource' button.
After that, you need to choose how you'd like your Airtable to be integrated with Jet Admin. You can either connect directly or sync it with Jet's internal database to get extended functionality.
If you want to be able to combine your Airtable data with data from other data sources, such as Firebase, Google Sheets, or even REST API within the same tables, you should choose the "Sync" connection for Google Sheets. You can learn more about it here:
After having connected your Airtable, you'll be prompted to choose pages you want Jet Admin to generate an admin panel (CRUD pages) for.
On Airtable side, you can create different views for each table. Each view allows you to filter and sort records. In Jetadmin you can choose to use only one view for each table when creating the resource. To view all records in each table, choose the main view 'All'.
The image below will show you the differences between the main view and the filtered views:
To switch to other views for each table, follow the steps below:
Click 'Edit resource' from the resource's settings menu
Click on 'Choose tables'
Select the needed views for each table
Click 'Update resource'.
API keys are deprecated by the end of January 2024.
Airtable's API keys stopped working and you will have to migrate to personal access tokens. Personal access tokens allow you to more securely grant API access to Airtable data.
When creating a new 'personal access token', please make sure you choose the 'data.records:write' scope if you need to view, add, edit, and delete records on Jetadmin's side.
Once you have downloaded the CSV files, follow the steps:
Log in to Jet Admin and create a new project. If you don't have an account, sign up for free.
Create a new project and add Jet Table as your data source, or if you have an existing project, integrate Jet Table by navigating to Data > Add Resource.
Click Import CSV
Select the Companies CSV you downloaded
Click Import file
Follow the same process to import Deals: Data > Jet Tables > Add or Import.
From the dropdown menu, choose Customize with Designer
Record Create: create new records using a form layout.
Dashboard: visual display of your data, incorporating KPIs and charts for a comprehensive overview.
Right Sidebar
.
Fix the borders for the text.
Data Privacy & Security
Where is my data stored, and is it secure?
Yes, your data is secure and is always stored by you, whether that be with your chosen data resources or on your own servers. We provide Jet Bridge that makes our architecture secure. Jet Bridge is a free and open-source app that generates an API and proxies the requests to databases and business apps. We don’t collect, copy, or host your private data on our side. Jet follows best practices to ensure that important data is only accessed by you and your users. Jet encrypts all data and credentials that go through our servers using an HTTPS connection.
Jet Admin offers you the ability to use Jet Tables, which is a PostgreSQL database hosted by Jet. Jet Tables, like other top-tier PostgreSQL databases, uses best practices to keep your data secure. Using Jet Tables is the only case in which your data would be stored on Jet servers, but there is no difference between the way Jet Admin allows you to access data in Jet Tables and the way that Jet allows you to access your data in other PostgreSQL databases, so your data remains secure, regardless of which databases you choose to use. You can learn more about Jet Tables here.
Host Jet Bridge on your servers. You can place it behind your VPN, in your own VPC. We won’t get access to your data, however, you will still receive interfaces updates normally.
If your infrastructure doesn't have access to the internet, you can use on-premise on your own servers and block all network connections. You can place it behind your VPN, in your own VPC.
To prevent bad consequences for your business, Jet Admin automatically creates a backup of your interface, so you can always restore it in case of an incident. Simply push the “Recover” button at the top right corner of your screen and select what you would like to backup.
Since Jet Admin doesn’t require access to your data, you are free to host your admin’s API under DMZ or VPN network. Once you do that, your admin panel will be separated from your public network, leaving no chance for malicious attacks or remote rooting. This might be on a checklist for some large healthcare and financial companies that can be held liable for clients’ personal information. In most cases though, it is not a necessity.
Build UI
Discover how to utilize components to build your app's user interface
Components are prebuilt UI elements your users engage in, such as Tables, Forms, Buttons. In this example, only a limited number of components are used; you can explore 50+ Components in the UI Component Library. Drag-and-drop components within LayoutColumns, Tabs, and Modals, facilitating the building of your app.
You'll be building an app that enables the creation and updating of Deals data. To enable this functionality, you'll add Table, Forms, and Modals. Learn more about in our documentation. Additionally, if you want to implement this functionality swiftly (Create, Update, Delete flow), you can generate it in seconds using .
Columns are used to set the horizontal component of the layout. You can add multiple columns and resize them.
When you select the Table component, the right panel automatically updates to display the properties of the component. Components come with a wide range of properties that you can configure. Properties are accessible from other components and queries, allowing for a more integrated and dynamic user interface experience.
Click Data Source – Jet Tables and the Deals collection that you've created.
Modify the Logo column to have a circular frame and position it as the first column.
Component Binding allows the passing of values between components. In this case, we will bind the Table and Filter components, enabling users to filter Deals by criteria such as Name, Priority, and Amount.
The final component to add is a Form component. This component will allow you to generate automatically based on your Collections fields.
Every field in the Form is individually configurable: you can add or remove fields from the Form, alter the field type, rearrange the order of the fields, and change appearance.
To update a deal, the user must select the corresponding row in the Table. You can configure the first row to be selected by default in a Table. To do this, go to the Display tab in the Table properties and choose Select the first row by default.
Next, let's set up the field type for the Priority field. We will configure it as a Select type with predefined options: High, Medium, and Low.
Click on Priority header in your table to access its settings
Choose Edit field to modify the field's properties.
Select the field type as Select. This allows you to create a dropdown menu with predefined options.
Click on Display to proceed with the visual setup.
Add predefined options for the 'Priority' field: High, Medium, and Low.
Use the Link to Record field type to establish a relationship between Deals and Companies. This will enable you to link these two tables, effectively associating specific deals with respective companies.
Click on Company id column in your table to access its settings.
Choose Edit field to modify the field's properties.
Select the field type as Link to record. This option allows you to create a link between the current record and another table.
Once you've established a Relation using the Link to Record field type, you can pull record contents from one linked record into another, and you can perform calculations on this Relation, enabling more complex data manipulations and analyses based on the interconnected data.
Next, we will focus on extracting and inserting the Company logo into the Deals table.
Click + New Column on the right-top
Select Lookup related field
Select Company_id > Logo
Customize your Portal
In this section you will learn how to customize your customer portal
In Jet Admin, you can customize the appearance of your Portal for better usability. Let's start with the Units table.
Let's disable unnecessary columns and rearrange the order.
Click on the Units Table
Disable the unnecessary columns
Let's now set the number of displayed rows to 5, and make the first row selected by default. To do that, follow the steps:
Go to the Display Tab
Set 5 in the Rows Per Table section
Enable the Select First Row By Default option
You can change the field types to render different fields differently and customize their appearance. To do so,
Click on the Priority field
Choose Low Option
Click on the Color field
In Jet Admin, you can configure and customize any component individually on any page. Let's make our record fields non-editable so that the users will be able to change them.
Click on the Unit ID field
From the menu on the right, change it to Editable
Click on the Assign To ID field
Applying similar edits to the Tasks table and we're done with the UI customization.
Now, let's invite external users and make them interact only with their data:
The community is where you can meet, get help & support, share resources and discuss what you're working on. The community is filled with thousands of kind and friendly users – many of them experts – who are willing to help each other out.
We have only a few simple guidelines:
Be polite and kind to other members
Use the search bar to see if your topic has been discussed before
Check out the community’s different
When posting questions, try to be clear and concise and write descriptive titles. If you need help with many different things, try posting them as separate topics.
Where possible, provide links (e.g. to your app), screenshots or even videos that help explain the point you are trying to make
Please be aware that everything you post in the forums is public
If you have questions that others could benefit from – try to post publicly and not privately message other members. Some of our experts and staff get a lot of DMs – bear in mind that there are many other people in the forum that may be able to help you.
Conditional Visibility
In Jet Admin, you can make certain components visible or invisible depending on the values or combination of values from your data or user attributes.
Say, we want to show two different status change buttons depending on the status value of the selected row of the users table:
If standard permissions are not enough and you may want to restrict access on the level of individual UI components, use in the visibility logical expression
To achieve that, let's first drop two buttons: one that changes the status of a user to "active" and the other that changes it to "inactive":
Then, we proceed to the "Activate" button's settings to the "Visible" section:
Next, we type in the condition: IF the status value from the selected row equals "inactive", then return true, otherwise, return false. Returned true will make the component visible and false will make it invisible:
Here's the expression: =IF(EQ(elements.users["0"].selected_item.Status, "inactive"), 1, 0)
Then we do the same for the "Deactivate" button, grabbing the "active" value from the selected row:
And we get our buttons being dynamically hidden based on the status value from the selected row:
Run Actions
Add actions that users can trigger
A helpful way to think about apps is through how users interact. Two elementary levels of interaction are viewing and editing data, which we built on the previous steps. But often, apps need to be able to perform custom actions with specific workflow.
Initiating a Form is a form of action. Actions such as Open Link and Show notification are native functionalities within Jet, triggering specific processes within your app.
In this tutorial, we'll set up a system to automatically send notifications to the user via email and Slack when a deal is marked as Closed Won.
Initiate the workflow when the Deal is updated, which occurs when the associated form is successfully submitted.
Add a conditional step in the workflow that checks whether the deal stage is set to Closed Won. For the conditional step, employ the 'Equals' operation using the EQ({deal_stage}, 'Closed Won') to verify if the deal stage matches the Closed Won status. The value for {deal_stage} is selected from Formula.
Send email. Add actions to send an email with the content formatted as: "Deal {0} is Closed Won". Here, {deal_name} should be dynamically inserted into the email content, and its value can be selected using a formula that references the {deal_name} field from the data source.
Show notifications. Use the same logic to implement notifications.
Pass values to Image
Explore how to data from Visual Builder to Component Designer
To pass data of type Image from Visual Builder to Component Designer, use the Parameters:
Click on Parameters in Toolbar
Click on Add Parameter in the Parameter sidebar
Click on Edit button to rename the Parameter
Change the type of the parameter to Image
Drop a test value for the Parameter
Save the test value
To show an image in the design, follow the steps:
Click on the shape you want to add an image to.
Go to the fills on the Right Sidebar.
Click on the Image button.
Pass values to Text Field
Discover how to pass values to Designer
To add text to your design, follow the steps:
From the menu on the top left, click on the Text button.
Locate the field in your design.
Add a test value to the field and save it.
To connect the text field to the parameter using the formula, follow the steps:
Click on the field you want to connect a parameter to.
Click on the Function button.
Click on the Function button inside the field to specify the parameter.
Hide elements
Discover how to hide elements with Conditional Visibility
Hiding elements is useful for optimization, such as concealing large navigation menus on smaller screens. Conditional visibility improves user experience by showing only relevant content.
Hide elements in Component Designer using Conditional Visibility:
Click on the element you want to set conditional visibility to.
Go to the Right Sidebar.
Click on the Conditional Visibility button.
Scroll and choose the option that fits the best for your requirements.
Dynamically change elements in Component Designer using Conditional Fill:
Click on the element you want to set the conditional fill to.
Go to the Right Sidebar.
Go to the Fill section.
Adding Images
Explore how to customize background
To add shapes, follow the steps:
Click on the Shape icon in the Toolbar at the top-left.
Select Rectangle as a Shape
Drag-and-drop Rectangle to the Canvas
Customize (resize, reshape, position,...) the Rectangle shape using the Right sidebar:
Click on Rectangle
Update the positioning of Rectangle
Update the corner radius of Rectangle
Add an Agent
Choose how to add a Jetadmin agent to your app
You can set up agents in several ways:
Use Jetadmin triggers by selecting “Agent” as the action when setting one up.
Choose from the component list: Type “Agent Chat” in the search box and drag it onto your page
Left menu: Click Agents → Add Agent.
Then choose to create an agent from scratch or use a built-in template.
Single relations
Single relations help you fetch data from the related collections.
To illustrate how it works, let's imagine we have the Transactions table that doesn't contain a customer's email and the Users table that contains the customer information including the email:
And we want to display the email in the Transactions list:
First of all, we identify how our tables are related: for each user, there are several transactions that are related to the users list by the ID and Customer ID fields:
Now, let's create a new custom column in the Transactions table:
Then change the column type to Link to record
Now, we need to select where we'll get the user email from (a related Users table), what field in the Users table is used to set relations with the Transactions table (the ID field), and what field from the Users table we'd like to display (the Email field):
And the final step is to get our custom field value from the Transactions table field that sets relations to the Users table (the Customer ID field):
Now, let's make UI components dynamically visible based on a rule:
Set the Layout
In this section you will learn how to set the layout for creating a customer portal
Jet Admin provides a library of pre-built UI components, such as Table, Map, Gallery, or Charts that you can drag and drop to display your data. As well as the Layout components that are used to assemble other components on the page.
Set the Layout
Columns are used to set the horizontal component of the layout. You can add multiple columns and resize them.
To add columns, follow the steps:
From the Layout menu, drag and drop Columns
Drag and Drop the Tasks Table in the Right Column
Drag and Drop a Form in the Left Column
We also can change the position of the individual fields in the record view. For that, drill down into the record and drag and drop the fields you want to reassemble:
Now, let's add our Project table and link it to the Tasks table:
Binding data
Discover how to pass and bind the data with elements
To pass and bind simple data with the elements, follow the steps:
Click on the Gallery
Click on the Property card
Click on the Change Data Binding
Pass the corresponding Data for each of the Custom Components.
Click Use Selected Binding for saving.
To pass and bind data with the elements using Functions, follow the steps:
Click on the Gallery
Click on the Property card
Click on the Change Data Binding
Send Emails
Send emails from a Jet app
Jet Email allows you to send emails via Action or Workflow/Automations. All emails will be sent through no-reply@jetadmin.app (unless you have set up a custom From email address in App Settings).
Use the following guide to set up emails, and specify the next operation:
Choose operation -> App built-ins
Action -> Send email
3. Specify inputs:
to – receiver email (allows only email's format)
subject – text field to specify the email subject
text – text field without markups
Agent Tools
Agents in JetAdmin use tools to interact with data, perform actions, and extend their capabilities.
Instead of defining logic manually, you can enable tools that allow the agent to fetch information, take actions, and process results.
Tool Capabilities
Data Access & Operations
Connect data sources and MCP integrations to let the agent:
Read and query records
Create new entries
Update existing data
Delete records when needed
This is essential for building agents that work with your application data.
Use built-in tools to perform actions inside your app, such as:
Sending emails
Accessing user or team data
Triggering internal processes
Enable tools that allow the agent to retrieve information from outside your system:
Internet Search: find up-to-date information
Fetch URL Content: read and analyze specific web pages
Allow the agent to generate new content:
Image generation: create visuals from prompts
Code execution: process data, run logic, or perform calculations
Pixel Perfect App
Design your first custom component from scratch using Component Designer
To familiarize yourself with how Customize with Designer works, let's build a simple design:
We'll go through the whole process of creation step-by-step.
1.1 Choose Component Type
Identify the type of component you want to create, whether a button, card or any other UI element.
1.2 Customization with Designer
Reading data from SQL
The SQL Query Builder lets you create, edit, and run queries easily. You can write SQL manually, insert tables and columns, or let AI generate queries and transformations for you.
You can type SQL directly in the editor or click Ask AI to describe what you need in plain language. AI will generate the SQL for you—for example, “show tickets created in 2019 with low priority.”
Or consider using AI to refine or write your SQL query for enhanced accuracy and efficiency.
On the right-hand panel, you will see a list of all available tables and their columns. By clicking on any table or column, it is automatically inserted into your SQL editor. This eliminates the need to manually type table names or remember exact column names, reducing errors and making query construction much faster.
The Query Builder also allows you to add dynamic parameters using the Insert Input option below the editor. Inputs act as placeholders for values that can change, so you can reuse the same query multiple times with different filters. This is particularly handy when running similar queries across different date ranges or user IDs without rewriting SQL each time.
Agents
Learn how to use Jetadmin Agents to automate tasks using natural language and LLMs, no coding or complex logic required.
Agents in JetAdmin are AI components that can understand a task, decide what actions to take, and execute them using available tools. They don’t rely on fixed steps instead, they determine the best way to complete a task based on your instructions and context.
Decision-based: choose actions instead of following fixed logic
Action-oriented: use tools, workflows, and data to get things done
Reading data from API
If you need to make your own API request, simply select "Make an HTTP request" as the operation. This allows you to connect to any external API and display the response data using available components, such as tables or charts. Just configure the request method, URL, headers, and any necessary parameters based on your API.
1. Go to the Component Settings then Add Data Resource
2. Select a resource then choose collection as Make an HTTP request
Now you are in API Query Builder. Specify endpoint and add any new parameter.
Scroll and choose the option that fits the best for your requirements.
Click on the Set up with Formula button
Click to search for the formula – CONCAT
Choose the fields: first_name and last_name – you want to concatenate: CONCAT(first_name, last_name)
Click on the Use selected binding for saving it
Step 1: How to add shapes
Select the shape you want to utilize from the menu on the top left. In the example, we will use Rectangle and Ellipse shapes.
Step 2: How to add parameters
To add a parameter to the card, you need to use the menu on the top left. After adding a parameter you need to specify type and test value.
Step 3: How to add borders
You can add borders to the shapes or reshape them. To add borders or reshape, choose the shape and use the menu on the right.
Step 4: How to locate fields
Use the tutorial below to locate the fields for the parameters.
After creating the design, you need to bind it with the table data.
For changing the visibility of a component please follow the steps as shown below.
To check how your design will respond to different screen sizes, please follow the steps shown below. Ensure that it maintains its integrity and functionality across various devices.
After running a query, use the Transform feature to adjust results. Choose from dropdown options or write custom JavaScript. AI can also generate transformation code to rename fields, restructure data, or filter results.
Click Test Request to run your query and check the results in the Preview panel. Once everything looks correct, click Save to reuse the query later—ideal for recurring reports or analysis.
SELECT *
FROM Tickets
WHERE "Opened date" BETWEEN '2018-01-01' AND '2024-12-31';
Writing and Generating Queries
Inserting Tables and Columns
Inserting Custom Inputs
Click Prettify SQL to automatically format your query, making it more readable and easier to debug.
Transforming Query Results
Testing, Previewing, and Saving
To get the most out of the SQL Query Builder, it’s a good idea to prettify queries regularly for readability, and make frequent use of AI assistance for complex SQL generation. Inputs should be used whenever possible to create dynamic, reusable queries. Transformations are a powerful way to adjust your results without altering the base SQL, and testing queries before saving ensures accuracy. Finally, previewing results after execution helps confirm that your query meets the intended goals.
Interactive: can be triggered through chat or other inputs
Contextual: use instructions and past input to guide behavior
1
Add an Agent
Add an agent to your app in JetAdmin using one of the following:
Add it as a component from the components panel
Create it inside a workflow using a trigger or step
Use the Agents section from the left sidebar
2
Connect the tools your agent will use to perform actions.
This can include:
Data sources (e.g. Airtable, Supabase, internal tables)
Integrations (e.g. APIs, external services)
3
Define how the agent should behave and what it should do. Keep instructions clear and specific to get better results.
Example (Data Manager Agent):
4
Run the agent with different inputs to make sure it:
Understands the task
Uses the correct tools
Agents in JetAdmin combine instructions, tools, and built-in decision logic to figure out the best way to complete a task, one step at a time.
What Are Agents?
Key Characteristics
Creating Your First Agent
How Agents Work
Agents: dynamic, decide the next step
Workflows: predefined, execute fixed steps
Agents can use workflows when structured execution is needed.
If you need to pass tokens or other important headers, simply navigate to the Headers section and add the required key-value pairs. For example: Authorization, Content-Type, or any custom token headers.
To transform the response, use the Transform feature to specify the result of your request:
If you need pagination, simply navigate to the Pagination section and choose your preferred type — such as Client-side or Server-side (Page, Offset, or Cursor Pagination).
For Client-side pagination, filters, sorting, and pagination are applied automatically — no additional configuration needed.
For Server-side pagination, select the appropriate type (Page, Offset, or Cursor) and configure the necessary parameters based on your API’s structure. You can also use a transformer to adjust the response format if needed.
Simply click Test Request button to run your request
Agents are useful when you need more than simple automation rules. They are best for:
Complex workflows where steps depend on reasoning or context.
Customer-facing chatbots that can pull data from multiple sources.
Task delegation when actions may involve multiple systems or tools.
Dynamic decisions that go beyond pre-defined logic.
If your task is straightforward and always follows the same pattern, a regular workflow or automation may be enough. If it requires flexibility and decision-making, an agent is the better choice.
Internal Actions
External Information
Content Generation
Best Practice
Focus on enabling only the tools required for your use case.
Fewer tools lead to more predictable behavior and better performance.
In this section you will learn how to link set Users and Permissions for creating a customer portal
The key functionality of any Portal is that any user or group of users see and interact only with their data. In this step, we'll invite our users and set permissions to turn our Airtable app into a secure portal.
Invite Users
Click Share and add the email of a user. Then we can invite this user to the existing team or create a New Team by clicking Add a new Team. In our example, we build a portal for corporate clients, so we'll create separate teams for every company we work with.
Click on the Share button
Paste the Email you want to send an invite to
Click on the Team Icon
Choose Add a New Team
Write the Name of the New Team
Click on the Create button
Then send invites to the users.
Team Properties and User Properties are used to set the data separation in Jet Admin. For each team or user, we add a Property that uniquely identifies a company or a client, such as domain or email. In our case, we use the company name:
Click on the Add Property
Choose the Name of the Property
Click on the Create button
Next, we need to filter our Portal's data by the property. Select the component you want to separate data for, proceed to filters, and set them Client field to match Client property what we've created.
Choose the Table
Click on the Filter icon
Choose Client -> Client equals
Additionally, we want our Coffee Beans employees to interact only with the portal page we've created. For this, go to the Teams and set page-level permissions to allow access to the Tasks , Tasks-edit and the Tasks-create pages:
Now, let's check how that works: the Beans Coffee employee that we've invited can see only their company's projects:
Agent Skills
Skills allow you to extend agent behavior with reusable instructions and capabilities.
A skill can contain custom instructions, knowledge, or specialized behaviors that agents can use when responding to users.
Skills can be attached to multiple agents and managed centrally.
To add a skill:
Open your agent settings
In the right-side Skills section, click
Agent Files
The Files feature allows you to view and manage files created by agents during conversations.
Files generated by agents are automatically collected and stored, making it easier to access outputs from long or complex conversations.
During conversations, agents can generate files such as reports, spreadsheets, documents, JSON data, or exported results.
All generated files are automatically saved to the agent’s Files section.
You're a data management assistant responsible for working with application data.

Your responsibilities:
1. Retrieve and display data based on user requests
2. Create new records when instructed
3. Update existing records with clear confirmation
4. Delete records only after explicit user approval
5. Analyze data and provide insights when requested

Guidelines:
- Always confirm before making changes that affect data
- Ensure accuracy when reading or modifying records
- Clearly explain any updates or actions performed
- If the request is unclear or incomplete, ask for clarification
In Jet Admin, Teams are the groups of users with the same permissions
Set the Data Separation
To be able to separate data, we need to have the property value in our data
Set Permissions
Add Skill
To upload an existing skill:
Click Upload Skill
Select the skill file from your device
The skill will be uploaded and added to the agent.
You can also create a skill manually.
Fill in the following fields:
Field
Description
Skill Name
Name of the skill
Description
Short description of what the skill does
Instructions
Detailed instructions and behavior for the skill
After completing the fields, click Create Skill.
After attaching a skill to an agent, you should define in the agent instructions:
When the skill should be used
How the skill should be used
Which types of requests should trigger the skill
This helps the agent understand when to apply the connected skill during conversations.
Best Practice
Keep skill instructions focused and specific.
Clearly describing when a skill should be used improves agent reliability and response quality.
Add a Skill
There are two ways to create a skill:
Upload a skill file
Write skill instructions manually
Upload a Skill
Write Skill Instructions
After creating a skill, you can:
Add it to multiple agents
Edit the skill
Using Skills in Agent Instructions
Click Files
Browse the list of generated files
You can perform the following actions on generated files:
Action
Description
View
Open and preview the file
Copy Link
Copy a direct link to the file
Download
Download the file to your device
File Type
.csv
.pdf
.doc / .docx
.xlsx / .xls
.json
File Storage
Files created by agents are automatically stored in JetAdmin storage and remain accessible from the Files section of the agent.
How It Works
File Actions
Supported File Types
Prettify SQL
Best Practices
Agent Automatic Tasks
Automatic Tasks allow agents to run automatically based on schedules, events, or predefined triggers.
This is useful for recurring reports, monitoring activities, notifications, data processing, and other automated workflows without requiring manual interaction.
To create a task:
Open Agent Settings
Navigate to Automatic Tasks
Download the skill
Replace the skill file
Delete the skill
Managing Skills
Click Add Task
Automatic tasks can be triggered in several ways:
Trigger
Description
At Regular Interval
Run repeatedly at a fixed interval
Based on Schedule
Run on a specific schedule
One-Time Run
Run once at a specified time
After selecting a trigger, configure the task settings.
Common options include:
Setting
Description
Schedule
Defines when the task should run
Message to Agent
Instructions the agent should execute on each run
Reply Options
Defines where task results should be sent
The following example sends an order report to Slack once per month.
Setting
Value
Trigger
Based on Schedule
Schedule
Once a Month
Message to Agent
Generate a summary of all orders from the previous month and provide key insights